Administering Learndash Courses

 Setting up a new course


To setup a new course, you need to do the following steps:

  1. Create the course in LearnDash

  2. Create a standalone Woocommerce product that links to the course. This is what let's users purchase the course as a standalone product without having to purchase the Level 2 membership.
    1. You set this up just like you would any other product, but then the key is to link to the course by selecting Product data - Courses and then selecting the corresponding LearnDash Course in the LearnDash Courses box .


  3. Add the standalone course product (not the course, but the woocommerce product) to the Level 2 membership in Woocommerce - Memberships. This is what allows users that are Level 2 members to access the course without having to purchase the standalone product.


  4. Update the Course Landing page so it has the shortcodes to hide the buttons to purchase the course for enrolled users, the button to purchase the standalone product for the course, and the button to purchase a level 2 membership , which would also give the user access to the course. The easiest way to do this is by copying and pasting these sections from an existing course landing page. You can use the Rob 2.0 Course as an example or if you made prettier buttons elsewhere, you should copy it from there.


    You don't have to do anything with this next block, but I am putting it here for my own information. In order to get that shortcode to hide content for users that are already enrolled in the course to work, I added the following code to the functions.php page:

    function custom_hide_content_for_enrolled_users( $atts, $content = null ) {
        // Get the current course ID
        $course_id = get_the_ID();

        // Ensure this is a LearnDash course page
        if ( get_post_type( $course_id ) === 'sfwd-courses' ) {
            // Get the current user ID
            $user_id = get_current_user_id();

            // Check if the user is enrolled
            if ( in_array( $course_id, learndash_user_get_enrolled_courses( $user_id ) ) ) {
                // Return empty if the user is enrolled (hides the content)
                return '';
            } else {
                // Return the content for non-enrolled users
                return do_shortcode( $content );
            }
        }

        return do_shortcode( $content );
    }
    add_shortcode( 'hide_for_enrolled', 'custom_hide_content_for_enrolled_users' );

  5. Update the url for the button that points to the standalone product to point to the url for the standalone product for this course. If you don't do this, it will point to the product for the course that you copied it from.


  6. Make sure the section that holds the buttons to purchase the course has an anchor on it called purchase. It should by default when you copy and paste it, but just in case it doesn't, you can add the anchor by selecting the block. This is needed because we link to this in the next step.

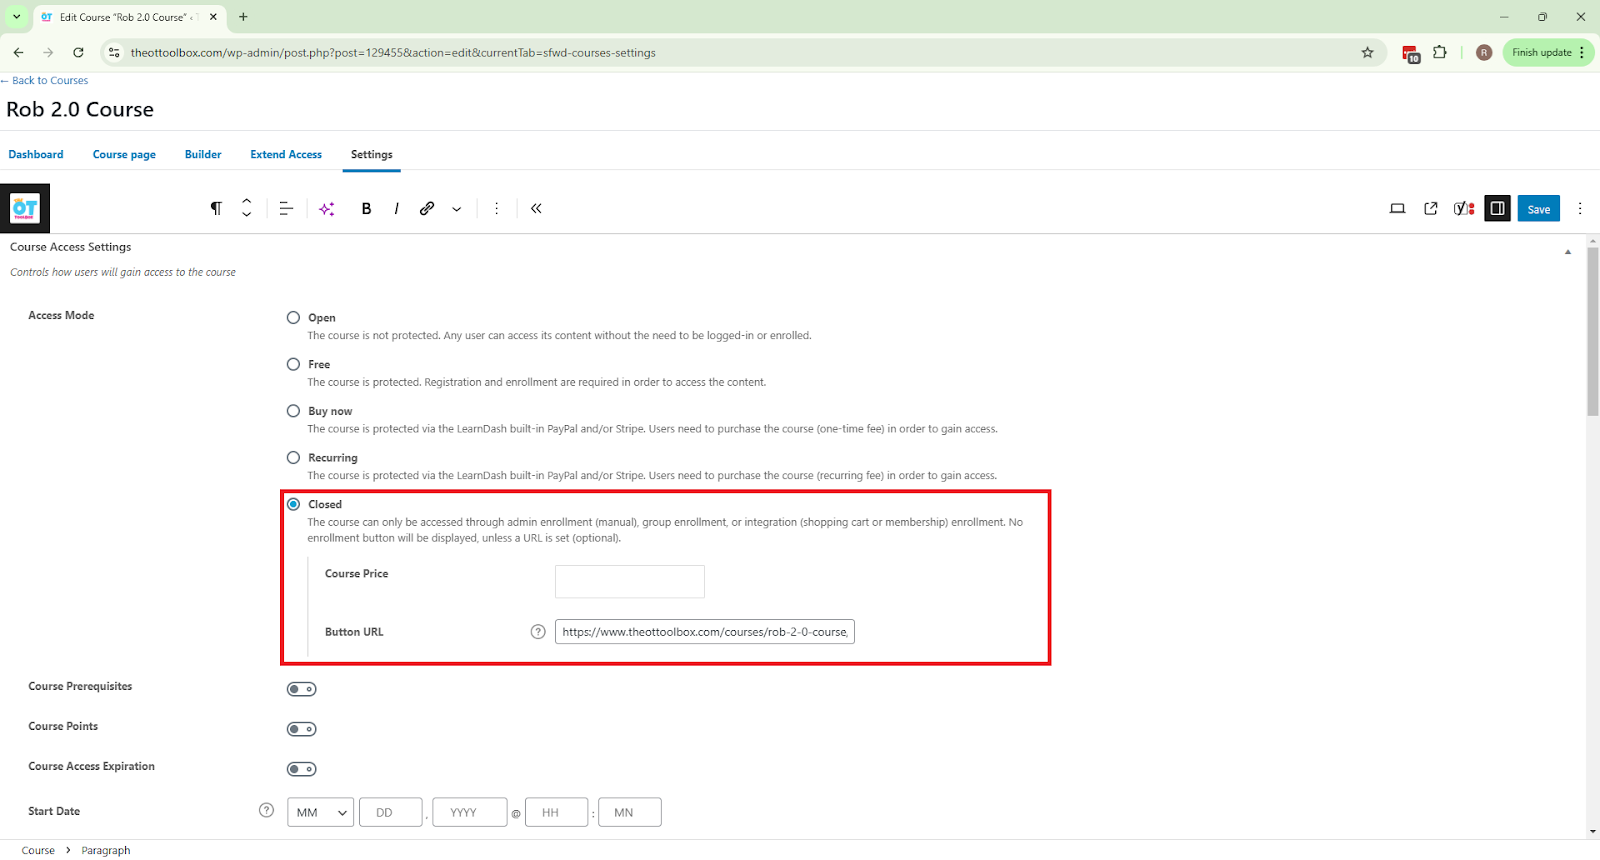
  7. Update the Course Settings so the Take this Course button points to the buttons to purchase the product (ex. https://www.theottoolbox.com/courses/rob-2-0-course/#purchase - notice how we include the #purchase in the url. This is why we need that anchor tag in the earlier step, so this url links to that)


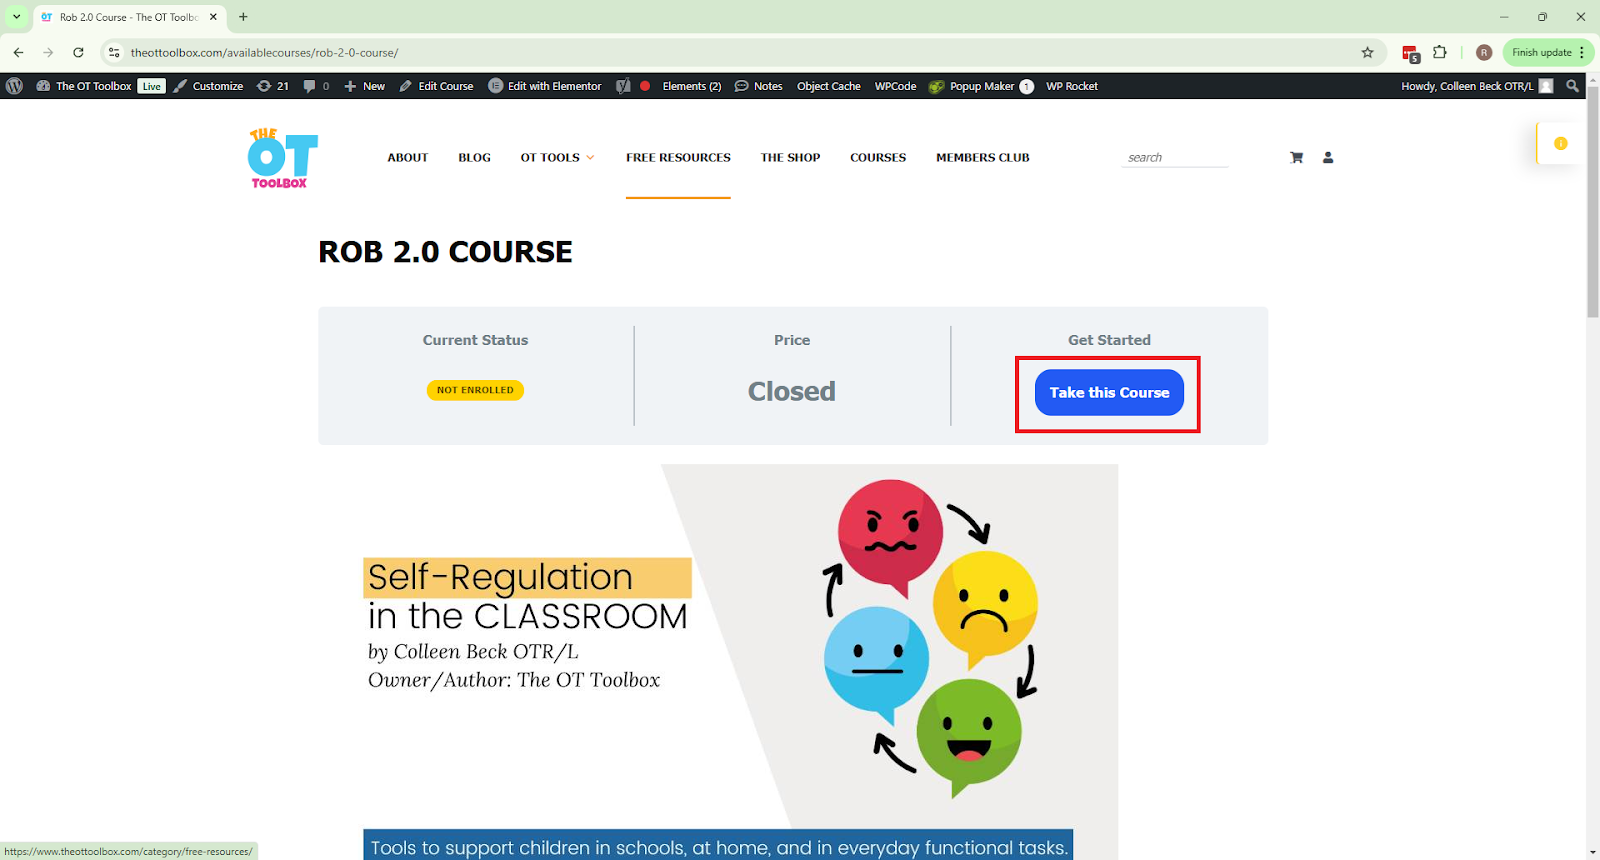
    This makes it so that when users click this button...


    They are taken to the options on how to purchase the course lower in the page:


Removing a user from a course

I noticed that refunding an order for a standalone course purchase or revoking a user's membership does not remove their access to a course. This is because they are already enrolled in the course. I don't know if this is good or bad. We would have to make a decision on that. But just in case we don't want them to have access for any reason once they are enrolled in a course, we need to manually remove them from the course. We remove them by doing the following:

  1. Find the user on the users page
  2. Edit the user
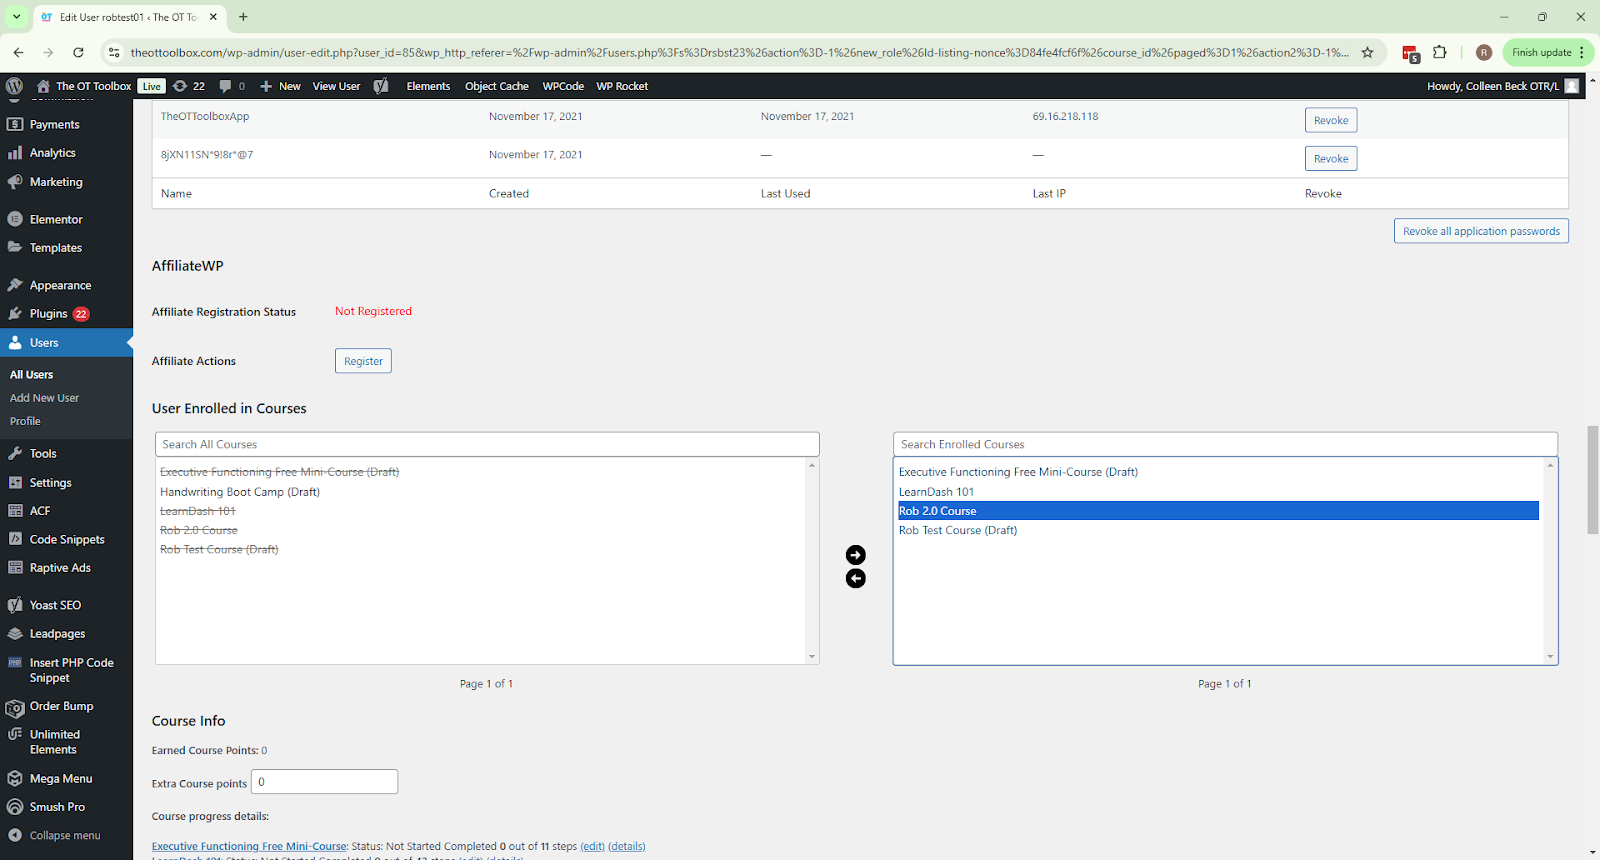
  3. Scroll down to the User Enrolled in Courses section
  4. Select the course you want to remove them from in the box on the right


  5. Click the arrow to move them to the box on the left


  6. Click the Update User button at the bottom


Other Notes:

  • I noticed that when I tried adding and removing memberships from the backend, without following the normal process that a user would follow, then the user did not have access to the course. If I purchased the Level 2 membership from the frontend, then they did get access the way we expected them to. This may have something to do with the way a Subscription is linked to the course. Or a product purchase. I just don't know for sure. So if we add users to the Level 2 membership from the backend, we may need to figure this out. Or give those users a coupon code to purchase the membership on their own.

Wordpress Hooks

  • muplugins_loaded
    • no after hook. 
    • This hook is triggered after Must-Use plugins are loaded and does not have a corresponding "after" hook.
  • plugins_loaded
    • no after hook. 
    • It indicates that all active plugins have been loaded. There is no specific "after" version.
  • setup_theme
    • after_setup_theme. 
    • The after_setup_theme hook is specifically designed to run after the theme has been initialized.
  • after_setup_theme
    • this is the after hook for setup_theme
  • unload_textdomain
    • no after hook
    • This hook is specifically used to unload a text domain, removing all translations associated with it from memory. It's particularly useful in scenarios where you need to switch translations or unload them entirely to free up resources or manage memory in a dynamic multilingual environment.
  • load_textdomain
    • no after hook
    • load_textdomain is a crucial function for setting up internationalization by loading a .mo file (which contains compiled translation data) into the text domain specified.
  • init
    • no after hook
    • This hook is used to trigger functions after WordPress has finished loading but before any headers are sent. There is no "after_init" hook, but wp_loaded often serves a similar purpose, indicating the system is fully loaded.
  • widgets_init
    • no after hook
    • The widgets_init action hook in WordPress is used to initialize widgets and register widget areas (also known as sidebars).
  • register_sidebar
    • this one is not a hook. it is a function that is called by other hooks/events
  • wp_loaded
    • no after hook
    • This hook is used to indicate that WordPress and all its plugins and themes have been fully loaded and instantiated.
  • parse_request
    • no after hook
    • This hook allows developers to manipulate the WP query object immediately after the query variables have been parsed.
  • send_headers
    • no after hook
    • The send_headers action hook in WordPress is used to modify HTTP headers before they are sent to the browser. This hook provides a mechanism to intercept and alter HTTP headers or perform actions based on header information. Its use implies that it is effectively the point at which you can last modify headers before they are sent out as part of the HTTP response.
  • pre_get_posts
    • No after hook
    • It is used to adjust the query parameters before the query is actually executed.
  • posts_selection
    • no after hook
    • The posts_selection hook in WordPress is a somewhat lesser-known action that is triggered just before the main WordPress query object (WP_Query) retrieves posts from the database. It allows you to perform actions or modify the environment immediately before posts are selected by the query. 
  • posts_request
    • no after hook. (this one is a filter, not a hook)
    • The posts_request hook in WordPress is a filter, not an action, which is used to modify the SQL query string that is generated by WP_Query just before it is sent to the database. This filter provides a way to adjust or completely replace the SQL query used to retrieve posts.
  • the_post
    • No after hook
    • This hook is used primarily within the loop to modify the global $post object as needed.
  • wp
    • No after hook
    • This hook runs once WordPress has set up all query variables and the current user, but before the actual query execution.
  • template_redirect
    • No after hook
    • This is used to redirect users before a template is loaded. It is a point to hook in and change the template that will be included but does not have an "after" counterpart.
  • get_header
    • no after hook
    • The get_header action hook in WordPress is used specifically to perform actions just before the header template file (header.php) is loaded. It is primarily utilized for enqueuing scripts, adding inline styles, or performing any setup required specifically for the header. 
  • wp_head (loading of scripts and styles)
    • no after hook
    • The wp_head action hook in WordPress is a crucial part of the theme and plugin ecosystem, providing a place to inject elements into the <head> section of HTML documents. This hook is used extensively to add metadata, link tags, inline styles, scripts, and other elements essential for a website's functionality and performance.
  • get_sidebar
    • no after hook
    • The get_sidebar action hook in WordPress is used to include sidebar template files, typically named sidebar.php, within a theme. This hook allows developers to execute code before and after the sidebar is loaded
  • get_footer
    • No after hook
    • The get_footer action hook in WordPress is used similarly to get_header, specifically for including the footer template file, typically named footer.php, within a theme. This hook allows developers to execute code just before the footer is loaded.
  • wp_footer
    • No after hook
    • The wp_footer action hook in WordPress is an essential part of theme development, used to insert necessary scripts, tracking codes, and other types of content into the footer of a WordPress site just before the closing </body> tag. It represents one of the last hooks you can use to output HTML or scripts before the HTML document ends.
  • wp_print_footer_scripts
    • No after hook
    • The wp_print_footer_scripts action hook in WordPress is used specifically for printing scripts enqueued for the footer. This hook is an essential part of WordPress's script loading mechanism, ensuring that scripts designated to be output in the footer are done so at the correct time.
  • admin_bar_menu
    • No after hook
    • The admin_bar_menu action hook in WordPress is used to manipulate the WordPress admin bar, also known as the Toolbar. It allows developers to add, remove, or modify items in the admin bar. 
  • wp_before_admin_bar_render
    • No after hook
    • The wp_before_admin_bar_render action hook in WordPress is specifically used to execute actions just before the WordPress admin bar (Toolbar) is rendered. This hook provides a timely opportunity to make last-minute adjustments or additions to the admin bar before it's output to the HTML of a page.
  • wp_after_admin_bar_render
    • Although there is no after hook for wp_before_admin_bar_render, this hook essentially serves that same purpose since it fires immediately after the admin bar is rendered.
  • shutdown
    • The shutdown action hook in WordPress is used to perform actions right before PHP finishes executing a script. It runs after WordPress has completed all its tasks and is about to conclude the page request. This is typically the last action hook that WordPress fires, making it ideal for tasks that need to be performed at the end of the execution cycle.

Escape Room Game - Add Meta Avatars SDK

 Add Meta Avatars SDK

I followed the course on Udemy to setup Meta Avatars with Photon / Fusion

https://www.udemy.com/course/unity-vr-meta-avatars-oculus-fusion/learn/lecture/40024280#questions/20877846

Basic Steps are to:


IMPORTANT:

I was hung up on this for hours, but to get the latest version (24.0) of Meta Avatars SDK working, you have to make sure you import the sample assets like this:


In the screenshot above it says Reimport, but that is because I already imported the samples. It would just say Import if I didn't already do that.


Escape Room Game - Add Photon

 Add Photon

Photon

Photon is a package that can be added for multiplayer games. This tool is free for small projects / independent developers. I had to create an account. The package works with a public server to sync the game across users.

Photon Website


Photon in Unity Tutorial


Escape Room Game - Create a Lobby Scene

 Create a Lobby Scene

Create a Room for the Scene


Select New Shape (or PolyShape, depending on what you are shape you want to use) in the ProBuilder Tools Window

Resize it to the size that you want

If you want to use the shape for your scene, then Flip the Normals

  • Select the Face mode icon (the far right icon at the top of the scene view)
  • Double click any face
  • In the ProBuilder window, click Flip the normals

Moving Around the Scene


Add an OVRPlayerController so I can walk around my scene. See Setup the Project for Oculus to learn how to do this.

Assets


Import the assets you want to use in your scene

If the assets are pink or magenta, 


Check all the checkboxes in the Render Pipeline Converter window


Click Initialize and Convert


Escape Room Game - Install ProGrids

 Install ProGrids

Go to Window -> Package Manager

Click the + icon with the dropdown arrow

Click Add package by name...

Enter com.unity.progrids and click Add


Once it is done being installed you will see this

The ProGrids Toolbar should show up automatically, but if it doesn't go to Tools -> ProGrids -> ProGrids Window and it will appear in your viewer


Escape Room Game - Install ProBuilder

Install ProBuilder

Follow the steps on this page to install ProBuilder in the project

https://docs.unity3d.com/Packages/com.unity.probuilder@4.0/manual/installing.html

The document doesn't mention it, but be sure to select Packages: Unity Registry before searching for ProBuilder or else it won't find it

Once you have ProBuilder open (as per the instructions on that link), click and drag it by the tab to dock it where you want it.

} else { }